
Axio Zoom V16 Operating Manual
Power ON Routine
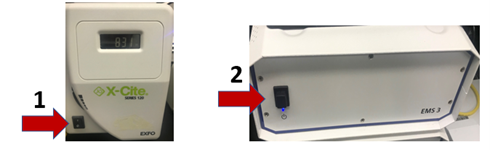
1. Turn on X-Cite epi-fluorescence light source for fluorescence imaging
2. Turn on EMS3 box
3. On the SYCOP 3, the system will prompt you to calibrate the stage: click yes to perform stage calibration. Make sure there is nothing blocking the stage.
4. Please check that you have no sample on the stage prior to running calibration. Click ‘OK’, The stage will move to the extreme ends of its travel range during the calibration, it is important that no sample be mounted to avoid any potential damage to the sample and/or the system. 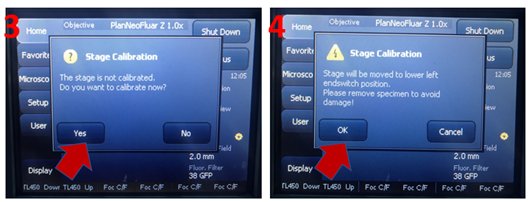
5. Login to the computer Using NetID and IGB password
6. Double click on Zen blue software then click Zen Pro and wait until initiation process is completed.
7. Click calibrate now then wait for the SYCOP to complete the focus calibration before mounting sample. 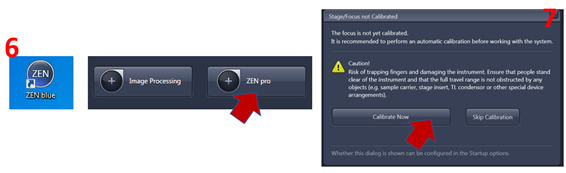
On the Zen software: 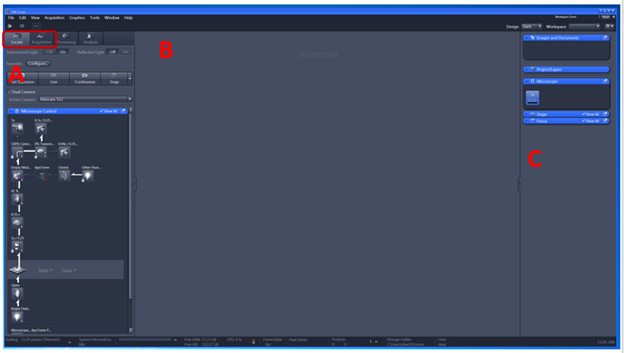
A. Image Acquisition Tools Represented by a group of blue bars each containing a series of tools for sample observation (Locate), image acquisition (acquisition), image processing and system maintenance. Locate tab also contains primary image capture functions. For imaging we will use locate and acquisition tab.
B. Image Display This area is where each newly captured image will appear. Settings here allow the user to control how the image is viewed on screen.
C. Catalog of Open Images This list displays each image that is currently open within the ZEN software. This area contains tools for saving data sets.
Mounting Sample
1. Place sample (in the center of field of view) underneath microscope objective.
2. Push eyepiece plunger IN to send light to eyepieces. 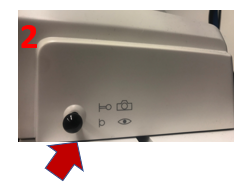
Fluorescence Imaging using AxioZoom V16
3. From Locate tab select filter for fluorescence (DAPI, FITC, AF 568) and reflected light ON 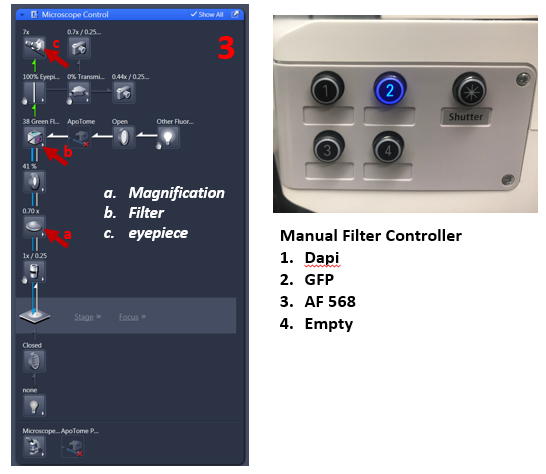
4. Using stage and focus controls, position (X, Y) and focus Z via the eyepieces 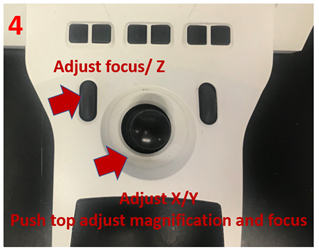
5. When a suitable location has been found, pull the eyepiece plunger OUT to camera
6. pull the mirror, for fluorescence we used AxioCam HR, 100% transmittance, 0% reflected,
7. Switch from locate tab to acquisition tab 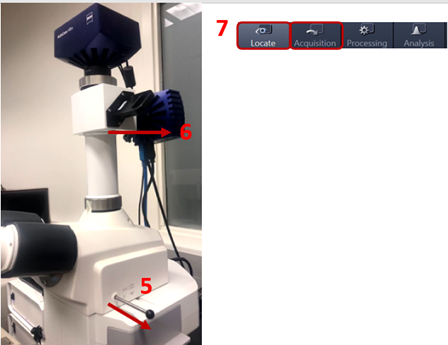
8. From Channel dialog, add track, dye, ref color, and camera (AxioCam HR)
9. Highlight the track and click set exposure. Note: Set Exposure is an automatic exposure measurement taken directly from the area of the sample exposed. If you have reasonably bright fluorescence, then this function works well but it may need to be fine-tuned. If your exposures are dimmer than required, you can either manually increase the exposure ‘Time’ slider or increase the ‘Shift %’ and run Set Exposure again. If your exposures are brighter than required, you can either manually decrease the exposure ‘Time’ slider or decrease the ‘Shift %’ and run Set Exposure again. Or click Live to adjust exposure time. You should use the range indicator to check if you have saturation in your image then adjust exposure time and shift. 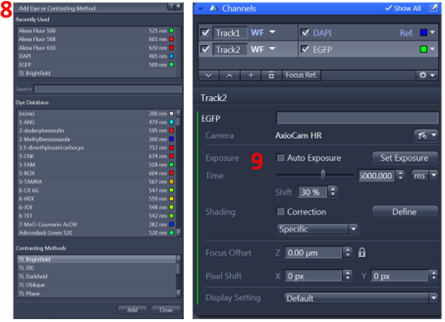
10. Repeat steps 9 for each Track (or color) you have.
11. When the exposure time has been measured for all Tracks, click ‘Snap’ to collect an image with all colors.
12. Select save the image
Bright field imaging using AxioZoom V16
1. Click Locate to see sample using the eyepiece, choose empty filter (4), make sure the light into eyepieces by pushing eyepiece plunger IN to send light to eyepieces. 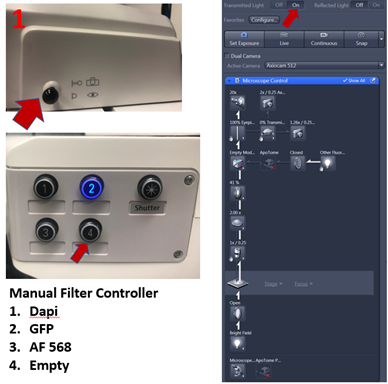
2. The brightfield light source is from the bottom or top (turn on the switch for the top LED light source) 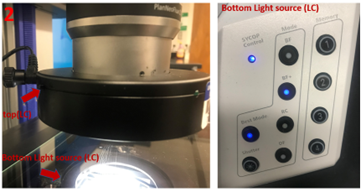
3. When a suitable location has been found, pull the eyepiece plunger OUT to camera
4. push the mirror, for brightfield we use AxioCam color (100% transmittance, 0% reflected) 
5. Switch from locate tab to acquisition tab
6. From Channel dialog, add track, choose TL brightfield, and color camera (AxioCam 512)
7. Highlight the track and click live and adjust exposure time. You should use the range indicator to check if you have saturation in your image then adjust exposure time and shift. On the display histogram you can check how much of the dynamic range you are using. 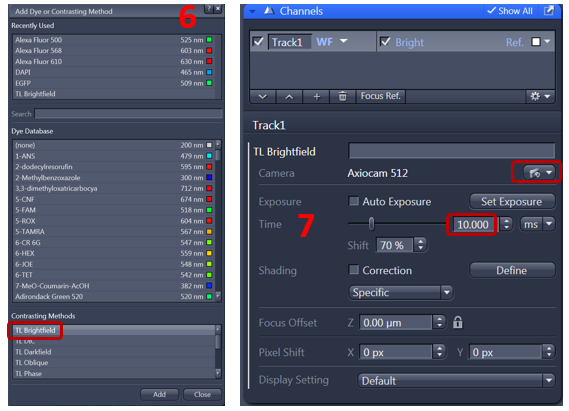
8. From the Acquisition Mode dialog, click ‘Auto’ from the White Balance settings. Note: The ‘Auto’ feature works reasonably well on most samples. You may need to use the ‘Color Temperature’ slider to optimize the image.
9. Click snap for a final image
10. Save the image
Using AxioZoom for Tiling
1. Check ‘Tiles’ from the experiment options. This will activate the Tiles dialog in the Multidimensional Acquisition settings
2. From the Tiles dialog, click ‘Advanced Setup’ to begin defining your tile regions. You can choose how many tiles and X and Y and click the plus sign to add the tile region. Alternatively, click Advanced Setup, this will open a preview window that allows you to interactively define your tile regions from the Live image display. The idea here is that we will define the tile boundaries from which ZEN will calculate the number of tiles required to cover the area selected
3. Using the XY joystick, move your stage position to the left most area of the sample. Position the left edge into the center of the live image field of view.
4. Using the ‘Tile Region Setup’ tools located directly below the image display, activate ‘Contour’.
5. Select the square contour tool
6. In the image display, click and drag to draw a yellow box around the live preview image.
7. Repeat step 5 and 6: using the XY joystick, move your stage position to the right, top, bottom most area of the sample. Position the top edge into the center of the live image field of view.
8. Once tile locations have been verified, close the Advanced Setup imaging window. 
9. From the ‘Options’ menu in the Tiles dialog, set your Tile Overlap to between 10%- 20% to start. Note: The more detail you have in the overlap area, the lower you can set your tile overlap percentage.
10. Click ‘Start Experiment’ to begin tile acquisition. Note: For Brightfield Imaging – shading correction can be acquired from an area void of any sample. Defocus slightly to eliminate any dust or debris from the stage. It is also critical that white balance be accurate and done before tiling.
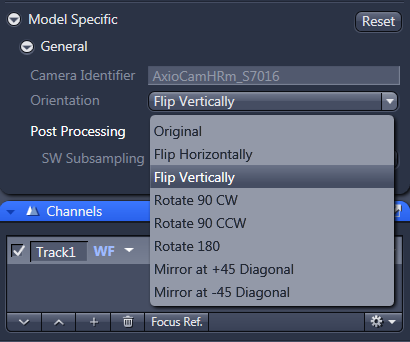
11. For tiling with AxioCam HR, select the orientation option 'flip vertically' from the dropdown menu in the 'model specific' tab under Acquisition parameters.
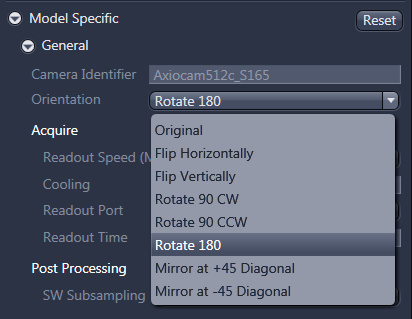
12. For tiling with AxioCam color, select the orientation option 'Rotate 180' from the dropdown menu in the 'model specific' tab under Acquisition parameters.
Shutting Down the System
1. Close Zen software
2. Transfer your data to the core server under your PI’s NETID: \\core-server.igb.illinois.edu
3. Logoff
4. Press Power button on EMS 3 box and wait for microscope to shutdown
5. Turn off X-Cite epi-fluorescence light source